
Hassle-Free Warranty
Lifetime for traditional optics;
3-5 years for digital scopes


Fast Delivery
In-stock items ship via
UPS/USPS in 2-3 days
UPS/USPS in 2-3 days

Easy Returns
30-day return & exchange

100% Secure Shopping
Trusted payment options;
4 interest-free payments with sezzle!
4 interest-free payments with sezzle!

Premium Support
Tel: +1(713) 364-9198
Email: info@dntoptics.com
Email: info@dntoptics.com


Top Trending
HS219 - Hydra 256x192 19mm Multi-Function Thermal Scope - Standalone Scope, Clip-On, Handheld Monocular
- $776.99
- $776.99
$976.99- Unit price
- per
HS335 - Hydra 384x288 35mm Multi-Function Thermal Scope - Standalone Scope, Clip-On, Handheld Monocular
- $1,554.99
- $1,554.99
$1,799.99- Unit price
- per
QDM150 Multi-Functional Quick Detach Mount 1.5″ Height Compatible with ThermNight, Hydra and ZULUS HD V1 & V2
- $110.99
- $110.99
$135.99- Unit price
- per
ZHD520-V2 - ZULUS HD V2 5-20X Digital Night Vision Scope
- $576.99
- $576.99
$799.99- Unit price
- per
HS225 - Hydra 256x192 25mm Multi-Function Thermal Scope - Standalone Scope, Clip-On, Handheld Monocular
- $887.99
- $887.99
$1,099.99- Unit price
- per
HS635 - Hydra 640x512 35mm Multi-Function Thermal Scope - Standalone Scope, Clip-On, Handheld Monocular
- $2,221.99
- $2,221.99
$2,599.99- Unit price
- per
TNC635R - ThermNight Thermal & Night Vision Multispectral Scope with Laser Rangefinder and Ballistic Calculator
- $3,159.99
- $3,159.99
$3,699.99- Unit price
- per
ZHD520R-V2 - ZULUS HD V2 5-20X Digital Night Vision Scope with Laser Rangefinder and Ballistic Calculator
- $776.99
- $776.99
$999.99- Unit price
- per
Accessories Bundle for ZULUS HD V2
- $128.99
- $128.99
$134.96- Unit price
- per
Accessories Bundle for Hydra
- $37.99
- $37.99
$39.97- Unit price
- per
Accessories Bundle for TNC335R & TNC635R
- $140.99
- $140.99
$149.95- Unit price
- per
Accessories Bundle for TNC225R
- $105.99
- $105.99
$109.95- Unit price
- per
MIL/LEO/First Responders
15% OFF Discounts
Step1: Verify your ID.me eligibility
Step2: Shopping your products and Discounts automatically applied
Step3: Savings reflected at checkout Verify with ID.me

*Only in the US Restrictions apply.


Happy Customer Reviews
R.
R.S.
So far I find the scope quite remarkable
So far I find the scope quite remarkable. I'm still sorting all that it will do but as far as it's intended purpose night vision it works perfectly. Light, easy to use and good optical performance being digital. Really well designed. Love it.
Sept. 22, 2025

TNC335R
J.
J.N.
Hydra HS635
I love the versatility of this scope especially with the QD mount installed. It takes seconds to remove or install on most firearms. The price point for this model is below all other manufacturers with the same features, size and clarity. After using this thermal on several hunts I one hundred percent recommend this to everyone!
Sept. 22, 2025

HS635
D.
D.A.
Great digital night scope
works great! I am impressed with the quality of the image. I’ve used military grade night vision (analog) and that is good stuff, but for this price it is a great buy. Yes you have to focus the image but it’s great. LRF works great and ballistic calculator I prefer holdover it adds the aiming point as different color crosshairs on your reticle. One shot zero works fine too. Very impressive.
Sept. 21, 2025

ZHD312R-V2
K.
K.C.
For the money you cannot beat it
For the money you cannot beat it. I’ve been shooting coyotes at 250 300 yards.
Sept. 20, 2025

TNC225R
T.
T.L.
So far so good
So far so good. Zeroed pretty easy. Looking forward to next month’s coyote hunting Montana!
Sept. 20, 2025
TNC335R
ST
Stanley K.
The Awesome Zulus 5-20 LRF V2
I have 2 zulus V2 and there is no other night vision scope on the market that will do what the V2 does. The clarity, ease of function, I will be purchasing another one in the near future.
Sept. 19, 2025
ZHD520R-V2
Videos


Blogs
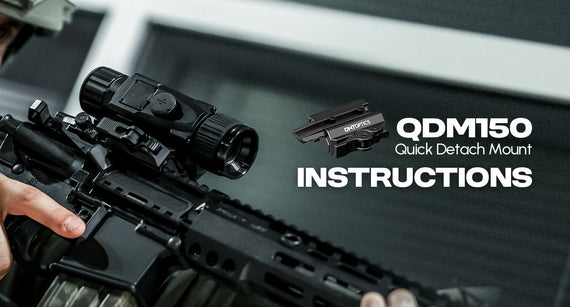
QDM150 Quick Detach Mount Instructions
The QDM150 is a versatile, multi-functional mount designed to enhance your shooting and hunting experience. When paired with the HYDRA series, it unlocks HYDRA's full potential, allowing seamless switching among clip-on, standalone, and handheld modes. It's also fully compatible with the ZULUS and ThermNight series, offering broad flexibility.
Featuring Picatinny slots on both sides, the QDM150 provides quick-detach functionality on one side, ensuring fast, secure mounting and removal. In this guide, we’ll walk you through how to use the QDM150 mount effectively.
STEP 1. Installing the Picatinny Rail Adapter to Your Scope
The QDM150 comes with a separate Picatinny rail adapter. To begin, install the adapter onto your scope using the two provided screws. The recommended torque is 35 in-lbs.
STEP 2. Choosing Your Mounting Direction
You can choose to fix the mount either to your rifle or to your scope.
Fixing the QDM150 to the Rifle (Recommended)
When the mount is fixed to the rifle, you can easily detach the scope and its attached adapter. This allows the HYDRA to quickly switch among clip-on, standalone, and handheld modes.
Fixing the QDM150 to the Scope
When the mount is fixed to the scope, the QDM150 functions like a standard quick detach mount, allowing you to quickly attach and detach the entire scope and mount assembly from the rifle.
The instructions below are based on fixing the QDM150 to the rifle. For the alternative mounting direction, refer to STEP 3 for fixing the QDM150 to the scope, and STEP 4 for attaching the scope (with the QDM150) to your rifle.
STEP 3. Fixing the QDM150 to Your Rifle
1. Loosen the two screws on the side plate of the mount.
2. Tilt the QDM150 slightly and align the mount with a slot on the Picatinny rail. Once aligned, roll the mount back to fit it securely onto the rail.
3. Fasten the two screws on the side plate to secure the mount. The recommended torque is 30 in-lbs.
STEP 4. Mounting Your Scope on the QDM150
Once the QDM150 is fixed to your rifle and the adapter is on your scope, you can mount the scope:
1. Press the locking latch down to release the lever.
2. Tilt the scope slightly and align a slot on the Picatinny adapter with the positioning block on the QDM150. Once aligned, roll the scope back to fit it securely onto the rail.
3. For accurate and consistent re-mounting, you can choose to use the supplied Picatinny rail fillers to block the unwanted slots on the adapter, leaving only your chosen slots available for alignment.
4. Push the lever back until the locking latch clicks, securing the scope in place.
STEP 5. Adjusting the Mount Spacing
If you encounter any of the following issues, you may need to adjust the mount's spacing:
The slot is too tight to fit your scope.
The lever is too tight to lock back into place.
The mount is not steady, or there is a gap between the mount and the scope.
To adjust the spacing, follow these steps:
1. Push and hold the lever toward the side plate to unlock the adjustment screw.
2. Tighten or loosen the adjustment screw using your fingers or a flat-head screwdriver.
3. Once adjusted, release the lever. The adjustment screw will automatically lock back into position.
STEP 6. Releasing the Mount
To quickly detach your scope from the rifle, press the locking latch to release the lever, then pull the lever to loosen the mount.
That's the QDM150 tutorial. Try it out for yourself and unlock its full potential!
Learn More >

A Triple-headed Marvel
Originally published by Russ Douglas at AIRGUN WORLD, this article examines the DNT Hydra HS335 thermal scope, a super-compact technical marvel that also easily acts as a spotter or front dayscope add-on. We're excited to share his insights.
The name may come from Greek mythology, describing a multi-headed serpent, but DNT’s new Hydra thermal scope “only” has three roles — and, for me, it performed two of them very well indeed. It comes nicely boxed, with everything safely protected inside a partitioned, zippered semi firm case, including a soft wrist lanyard. Inside are the scope, a cardboard box containing a 20 MOA Picatinny mount adapter, four countersunk T25 Torx screws and a Torx wrench. Also included are a pull-on/off corrugated rubber eyecup, sprung objective lens cap, instruction manual, lens cloth and a USB-A to USB-C download cable.
All models take a single 18650 flat-top battery, display on a Micro OLED screen at 1024 × 768px, and record video with sound at 50 FPS onto 32GB internal memory. Base weight is 380g and size is just 202mm × 68mm × 50mm. I tested the HS335, identifiable by its name badge and 35mm objective lens.
In scope configuration this model weighed 573g (1lb 4.2oz) all-in, including the Picatinny adapter, four T25 screws, flat-top 18650 battery, eyecup and sprung lens cap. On the left side is an unobtrusive battery compartment (insert flat-top 18650 +ve end first), with a long, wellgrooved cap — sure signs the DNT design team applied lessons learned when recently designing their ZULUS V2 models. There’s a captive round rubber cap on the right side to protect the USB-C comms port (for downloading recordings, but not for charging the onboard battery), and aft of that a flat synthetic panel covering the Wi-Fi aerial. All in, the device feels slimline, solid and well-engineered.
FUNCTIONALITY
First off, it comes ready to use as a handheld spotter and, being compact, is pretty handy too—only missing (for me) a neck lanyard ring, so I could walk on crutches while keeping it accessible. I was able to direct it and access all the buttons one-handed while leaning on one crutch, only using both hands when required to focus the rear display’s grooved/ridged alloy dioptre collar or the front objective lens’ ridged, rubberised focus collar. The latter is quite stiff, which is one of only two niggles I had when reviewing the unit. If fortunate enough to buy one, I’d add a standard fishing coaster for rifle-mounted use, until things ease off a touch through regular use. The raised power button is at the front, followed by a discreet LED power indicator and three more rubber buttons: zoom, settings and record (Zoom and Record act as up/down menu buttons). The unit takes around 10 seconds to power up (blue LED) and can be quickly put into or taken out of standby with one press — though the amber standby LED is faint.
The uncluttered display includes a discreet DNT logo in the bottom-left; top-right (left to right) are zoom status, audio, battery level (four bars) and time. The zoom control cycles upwards through 3x, 4.5x, 6x, 9x, and 12x, then back to 3x.
Display-wise, the palettes are White-hot, Black-hot, Red-hot and Iron-hot. My functional preference is White-hot, although I usually check whether Black-hot works better in the current weather conditions. Naturally, White-hot mode results in a darker screen and therefore less nighttime “stink eye”, although the display brightness can be adjusted via the menu within the sub-menu “Function Settings”. With Gyroscope enabled, there’s also a cant indicator (centre-left) and an inclination/declination indicator (centre-right), though I prefer to disable these to minimise distractions. The buttons above and below the menu (return) button step through the various menu options; after selecting an item, a longer press on the menu button returns to the previous tier.
Being a triple-role imager, the naturally comprehensive menus offers:
MAIN MENU
Recoil Activated Recording (Auto mode, Manual mode, Off)
Image Super Resolution (On / Off)
Thermal Image Settings
Thermal Imaging Mode (Natural / Enhanced or Highlight)
NUC, AKA non-uniformity correction (Auto mode or Manual mode)
Palettes (White, black, Red or Iron)
Image Contrast (1-5) Image Brightness (1-5) Image Sharpness (1-5)
Hotspot tracking (on / off)
Function Settings
Defective Pixel Repair (manual functionality)
Auto Power Off (Off, 10 minutes, 20 minutes or 30 minutes)
Loop Recording (Off, 1min, 3 minutes or 5 minutes)
Audio Recoding (On / Off)
Gyroscope (On / Off / Calibration)
Brightness (levels 1 – 5)
System Settings
Date / Time
Language setting
Format
Restore default settings
Available Storage
Version
Clip-On Mode (On / Off) – this adjusts the display to a smaller / central portion of the screen, for rear scope viewing, as the corners of the display will no longer be visible
Connections – WiFi (On / Off)
Reticle Zeroing
26 lettered profiles A–Z
Freeze (On / Off)
X: (adjust values using up or down buttons)
Y: (likewise)
Save
Exit
Reticle Settings
Reticles
1 FFP (MIL)
2 FFP (MOA)
3 – 8 SFP. My Flickr album includes screenshots of all reticle designs
Hide (for spotting)
Reticle Colours
Red
Green
Yellow
Black
White
PIP (overlapping squares) Settings
Off / Left / Centre / Right
PERFORMANCE
I found the image very natural, with good “shades of grey”, and not at all harshly contrasted like some thermal imagers. Naturally, however, due to the limitations of the sensor array size, progressive zooming inherently becomes more pixelated as magnification increases. You can remove the rubber eyecup and rest the eyebell against your eyebrow for spotting or PCP shooting, but thankfully the display wasn’t obscured when using the corrugated eyecup — so for once I left it on to reduce extraneous light.
I first watched a rabbit on our track at around 120 metres, then another in our garden at about 30 metres — the detail was great. I was confident I’d have seen anything visible out to many hundreds of metres, as I could even see insects in the air. I found the two colourful palettes a bit jarring and perhaps slightly pixelated — this is because there are hundreds of shades of grey, but far fewer colour shades within the display.
Activating “Image Super Resolution” via the menu does clean up the image slightly, so it’s worth remembering this. As with all thermal imagers, periodic recalibration is required — where the sensor “clears” or refreshes — often called Flat Field Correction (FFC). With the Hydra, this is “NUC” or “Non-Uniformity Correction”: a split-second pause or freeze in the image when on Auto, so it’s literally “blink and you miss it”, although you’ll hear the faint click. There’s no warning or countdown when this is approaching, though you can select Auto or Manual calibration via the menu.
AIR RIFLE MOUNTING
Like the improved DNT ZULUS V2, the Hydra comes with either a 0 MOA or 20 MOA mount — both are cross-compatible across the DNT range. The Picatinny adapter includes a fixed recoil arrestor bar and connects to the scope underside via four countersunk T25 Torx screws. The mount’s side clamp secures to your rifle’s Picatinny rail using three T25 coach screws, and an L-shaped T25 Torx wrench is supplied.
I mounted the 0 MOA version on my Krait near the rear of the rail. Eye relief was good after I slightly extended the Krait’s rear buttstock — perfect. Being thermal, there’s no active IR illumination required, though as with all thermal imagers, avoid looking at intense heat sources to protect the sensitive onboard sensor.
ZEROING
This proved to be an absolute doddle, and thanks to the Hydra’s sensitivity, I didn’t need any thermal targets. I simply stood a sheet of plywood at 9m (ranged with a prototype DNT Hound thermal spotter with onboard LRF, as the Hydra doesn’t have one), and my first shot was clearly visible and very central. That glowing impact became the aim point for my second shot.
Within the menu, step through options using up/down, select via the Settings button (yellow highlight), adjust values, then deselect to lock it in. Choose your zero name from A to Z. I repeated this process at 21m and again at 31m—zeroing the combo in just a few shots.
As usual with any “one-shot zero” system, it can take a few attempts to freeze the image precisely, but the Hydra’s sensitivity meant the pellet impacts glowed long enough. I then tested it further at 52m on an old shed wall. The impacts didn’t glow as brightly — possibly due to reduced friction — but they were still visible, which was impressive.
My 30m zero values were just X: 21 and Y: 33 — perfectly central — proving the 0 MOA mount was the right choice for my Krait’s 20 MOA rail. Above 3x magnification the reticle auto-centres — an excellent feature to keep the image aligned even if significant X or Y offset is required.
ADD-ON OR NOT?
I’m generally not a fan of add-ons, whether at the front or the rear. But I don’t currently own a rifle with a sufficiently long Picatinny rail to mount both the Hydra and a compact day scope, so I couldn’t test this format. For those who can, mount the Hydra in front of your day scope, set it to “Clip-On” mode, and either disable the digital reticle and use your day scope’s reticle, or enable it and ignore the glassetched reticle. Then adjust the Hydra’s dioptre and your scope’s objective focus until the thermal display is clearly visible. Naturally, due to possible misalignment on reattachment, a zero check is essential before engaging live quarry to ensure humane dispatch.
I’ve been very impressed with how easy it was to mount and zero, and how clearly it displayed thermal signatures downrange, from pellets in a shed to warm patches of grass left by rabbits.
Prices starts from $699.99 (after 10% off with code: SAVE10). For more information on the DNT Hydra, visit here.
Learn More >

DNT Launches New Hydra Thermal Scopes: HS219 and HS335 for Entry-Level and Advanced Hunters
On September 19, DNT introduced two new Hydra 3-in-1 thermal scopes, HS219 and HS335. Both models integrate standalone scope, clip-on, and handheld monocular functions to meet different user needs: the HS219 serves as a versatile entry-level option with unbeatable value, while the HS335 delivers next-level performance and precision, ideal for advanced hunters.
Clear Micro-OLED Display & Powerful Thermal Imaging
Both the HS219 and HS335 feature Micro-OLED displays (1024×768 @50 Hz) for real-time thermal imaging. The HS219 is equipped with a 12 μm, ≤25 mK uncooled infrared sensor with a 256×192 resolution and a 19 mm lens. It offers a 2x base magnification with flexible digital zoom options (2x, 3x, 4x, 6x, and 8x).
The HS335, on the other hand, comes with a 12 μm, ≤18 mK sensor and a 384×288 resolution. Its 35 mm objective lens extends detection range and ensures clear target recognition. With a 3x base magnification and digital zoom levels up to 12x (3x, 4.5x, 6x, 9x, 12x), the HS335 guarantees clarity even in challenging environments.
AI-Enhanced Image Super Resolution
Both models feature DNT's proprietary Image Super Resolution (ISR) technology. ISR boosts the HS219 to the equivalent of a 384 sensor and the HS335 to the near-equivalent of a 640 sensor. This eliminates the common loss of detail during digital zoom, delivering sharper, more detailed visuals without compromising smoothness.
Lightweight and Durable Design
The HS219 weighs just 13.2 oz (373 g) and offers up to 5.5 hours of continuous use per charge.The HS335 weighs 13.7 oz (389 g) and runs for up to 4.5 hours. Measuring 7.8 × 2.7 × 2.0 in, it is also the most compact model in the Hydra series, combining portability with endurance to support demanding outdoor use.
In terms of build quality, both models share the Hydra series' signature design: CNC machined from a single block of aircraft-grade aluminum, ensuring extreme durability in all environments.
Smart Connectivity with the DNT App
The HS219 and HS335 both support the DNT App, allowing users to stream live views from the scope, manage and edit content, and share hunting or shooting adventures instantly — making every expedition more interactive and exciting.
Quick Detach Mount for More Flexibility
Alongside the new thermal scopes, DNT also released the QDM150 quick detach mount, tailored for the Hydra series. Sold separately, the QDM150 can be paired with any Hydra device to enable instant switching between standalone scope, clip-on, and handheld monocular modes, unlocking even greater versatility.
Pricing and Availability
Product
Price (USD)
Price with 10% OFF
(Use Code: SAVE10)
HS219
$776.99
$699.99
HS225
$887.99
$799.99
HS325
$1,332.99
$1199.99
HS335
$1554.99
$1399.99
HS635
$2,221.99
$1999.99
QDM150
$111.99
$99.99
Using the code SAVE10, you can enjoy 10% off on all DNT Optics products. The HS219 offers exceptional value, the HS335 delivers next-level performance, and the QDM150 is a budget-friendly accessory built to unleash the full potential of your Hydra.
With top-tier features at such competitive pricing, what are you waiting for? Upgrade your experience today!
Learn More >

Field Review: The New DNT ZULUS HD V2 5–20× LRF Scope
Originally published by George Larcombe, Environmental Consultant specialising in Deer & Wildlife Management, on WildForce, this review shares his hands-on experience with the ZULUS ZHD520R-V2. We're pleased to bring his perspective to our readers.
“Outstanding clarity and performance at a price point that makes sense.”
Introduction
In my line of work, reliable optics aren't a luxury — they're essential. As an environmental consultant specialising in deer and wildlife management, I spend countless hours in the field, often in low light or at night, where equipment must perform without compromise.
Recently, I've had the opportunity to test the new DNT ZULUS HD V2 5–20× LRF Saope, and it has quickly proven itself as a tool that delivers in real-world conditions.
Setup and Build
One of the first things I noticed was just how easy the scope was to set up. The controls are intuitive, and zeroing was very straightforward, meaning I was field-ready almost immediately.
The scope also feels very well built — compact, solid in hand, and clearly designed to withstand the knocks of professional fieldwork. At under 8 inches in length and around 19 ounces in weight, it balances well on the rifle without adding bulk.
Optical Performance
The combination of the Sony STARVIS 2 sensor and the 1920×1080 OLED display provides impressive clarity. In daylight, it rivals traditional glass; at dusk, detail remains sharp when other digital scopes begin to struggle; and at night, it comes into its own.
The updated IR illuminator produces a clean, even beam — ideal for scanning open fields, woodland edges, and farm environments.
Rangefinding and Ballistics
The integrated laser rangefinder and ballistic calculator are practical features that make a genuine difference in the field. With accurate rangefinding out to 1,100 yards, there's no second-guessing. The ballistic calculator provides reliable drop compensation, giving confidence when shooting across varied terrain.
Battery and Usability
The shift to a 21700 Battery is a welcome upgrade, providing close to 10 hours of runtime. This comfortably covers long evening sessions or dawn-to-dusk outings without worry. The larger, brighter display is also easier on the eyes during extended use, especially in low light.
Wildlife Management
Across my work in wildlife and deer management, the ZULUS V2 has proven to be a great addition to different rifles. Its versatility, ease of use, and clarity make it a valuable tool across a broad range of field tasks, from pest control to licensed deer management.
Price and Value
What really stands out is the value for money. For the performance and features on offer — particularly the integrated rangefinder and ballistic calculator — I've been very impressed with the quality relative to the price tag.
When compared to other scopes on the market, the ZULUS V2 is a serious contender, delivering capability that would normally cost significantly more.
Final Thoughts
The DNT ZULUS HD V2 5–20× LRF has been easy to set up, straightforward to zero, and feels extremely well built. Add to that excellent day/night performance, practical rangefinding, long battery life, and a competitive price point, and you have a scope that's hard to overlook.
For me, it's not just an upgrade on the previous model — it's a dependable, versatile optic that I'll continue to use with confidence in my fieldwork.
Professional Summary:
The ZULUS V2 is a practical, well-priced, and highly capable tool. I would recommend it not only to fellow professionals in wildlife and deer management, but also to serious stalkers and pest controllers seeking reliable, versatile performance well beyond its price point.
Ready to upgrade your optics? Discover the ZULUS HD V2 Series now.
Learn More >

Best Crossbow Scope 2025: ZULUS HD Digital Day & Night Vision
Crossbow hunting is a thrilling pursuit that blends the excitement of precision shooting with the challenge of the wild. Yet no matter how skilled you are, success often comes down to one critical factor: your crossbow scope.
Now that deer hunting season is underway, this article will show you why upgrading to ZULUS gives you an edge others simply don't have.
The Accuracy Challenges of Crossbow Hunting
For crossbow hunters, accuracy still depends heavily on arrow drop, wind, and precise distance estimation. Since modern crossbows are most effective within 20 to 60 yards, optics that deliver exact ranging and drop compensation are essential, especially when you're hunting at the edge of that distance.
Then there's the problem of light. Many hunters report difficulty identifying targets at dawn, dusk, or in dense cover. That's why many hunters turn to digital night vision scopes for faster and clearer target acquisition. A lightweight, well-calibrated scope doesn't just keep your crossbow balanced, but it ensures steady, confident shots in real hunting scenarios.
How ZULUS Solves Accuracy Problems
ZULUS solves these challenges with a powerful set of features:
For LRF models, the built-in laser rangefinder (LRF) and ballistic calculator instantly provide precise drop compensation based on distance, helping hunters stay accurate at every range.
ZULUS also delivers exceptional digital day and night vision. Powered by Sony's advanced STARVIS 2 sensor and ED glass lenses, it provides crystal-clear visuals from bright daylight to total darkness.
Durability is another hallmark. With an IP67 waterproof and dustproof rating, a shockproof housing recoil-rated up to .50 BMG, and up to 8 hours of continuous use on a 21700 flat-top battery (ZULUS HD V2), ZULUS is built to withstand harsh field conditions.
With a ZULUS scope on your crossbow, you can count on:
● Enhanced accuracy at every practical hunting range.
● Extended hunting hours, from dawn's first light to the cover of night.
● Reliable performance across dense forests, open fields, and low-light shadows.
Reviews from Real Crossbow Hunters
Don't just take our word for it. Crossbow hunters themselves prove the point.
Mark Tedesco, who purchased the ZHD312R multiple times, commented: "My 3rd one. I wouldn't have bought three of them for three different crossbows if I didn't love it." His loyalty to ZULUS shows how well it balances precision with real-world usability.
Steven Dymond shared his experience with a ZHD312R-V2 mounted on a TenPoint TRX 515 Crossbow: "Great scope! Setup and zeroing were straightforward, and the ballistics setup was easy. Now I can put many more shots through it and charge confidently into hunting season. Very much worth the investment!"
Rich Johnson, a passionate crossbow hunter, mounted a ZHD312R-V2 on his TenPoint TX series crossbow. From his very first shots, he was impressed. Whether tracking whitetails in daylight or raccoons at night, the view remained remarkably clear. He called it "deadly accurate", praising its low-light clarity and repeatable precision even at 102 yards.
Find the Perfect ZULUS Match for Your Crossbow
Finding the right ZULUS model depends on your hunting style, range needs, and whether you require built-in ranging for precise shots. Here's a quick guide to help you choose:
● ZHD312R-V2: HD recording, 3-12x magnification, and built-in Laser Rangefinder. Perfect for crossbow hunters who want automatic ranging for deer season or mid-range hunts. The V2 is upgraded with more intuitive controls and longer battery life compared to the V1.
● ZHD312-V2: HD recording, 3-12x magnification without LRF. Budget-friendly entry points for beginners or those who don't need ranging, without sacrificing image quality or day-to-night performance.
Unlock Your Crossbow's Full Potential with ZULUS
Crossbow hunting is all about precision, patience, and preparation. Your optics should match that spirit. With the ZULUS HD Series, you gain the tools to measure smarter, the clarity to see farther, and the ruggedness to hunt harder.
If you want to extend your range or hunt with a rifle, we also offer ZHD520-V2 and ZHD520R-V2 with 5-20x magnification.
Want an edge this hunting season? Aim with ZULUS.
Learn More >

Buyer's Verdict: Is the ZULUS ZHD520R-V2 Digital Night Vision Scope Really Worth It?
Since the release of the ZULUS HD V2 series, the ZHD520R-V2 has generated significant buzz in the industry thanks to its refined design and upgraded features. Now that the first round of reviews are in, let’s h ear what professional hunters and outdoor enthusiasts have to say about this digital day and night vision scope.
"Blown away by the clarity of this scope!"
When purchasing a night vision scope, image quality is obviously one of the most important factors to consider. So, how does the ZHD520R-V2 perform in real-world applications?
@Top Shot Dustin, a seasoned shooting and hunting YouTuber known for his in-depth gear reviews and real-world tests, shared his firsthand experience, “I just wanted you to look through the optic. Everything’s super bright, even in the shadows. If there were a deer or hog on the lane to the right, I wouldn’t be able to see a thing. But through the DNT, it looks just fine.”
@On the Chase Outdoors is a YouTuber focused on outdoor adventures and hunting. He took the ZHD520R-V2 on a hog hunting trip and highly praised it, saying, “This optic will get you out into the pitch black. You can go full predator mode on pigs, coyotes, rats, foxes—whatever you need to hunt, this optic will get it done.”
In addition to the influencers, regular users share similar sentiments.
John Ross Rinacke noted, “Daytime image quality is excellent... Even at 20x zoom, image quality remains solid. There's slight pixelation, sure, but nothing that affects performance. The night vision is impressive... Out in the country, the IR illuminator really shines—literally. I could see out to around 500-600 yards with no issue.”
Jarrod Copeland was "blown away" by the scope's clarity and said, “The auto IR mode is a game changer! NO MORE GLARE!! The stock IR light is plenty capable, and I don't see the need for an additional IR source.”
"The Ballistic Calculator is amazing."
Beyond its clarity, the ZHD520R-V2 also excels in rangefinding and long-distance shooting.
John Ross Rinacke praised the scope, saying, “The built-in ballistics calculator is incredibly accurate. It matches the mil adjustments I get from both the Hornady and Applied Ballistics apps.”
Michael Shackelford, who already owned a ZULUS V1 non-LRF model, decided to upgrade to the V2 for the rangefinder and ballistic calculator. After testing it, he was impressed and exclaimed, “Wow. I have 28 optics as of now, including thermals, and I must say, price doesn't prevent performance. One of my favorites.”
Martin Lee Andrada, who is in the military and uses white phosphorus night vision goggles all the time, was initially skeptical about digital night vision scopes. However, after trying the ZHD520R-V2, his first digital night vision scope, he happily commented, “I can honestly say how impressed I was with the quality of the night vision! Especially considering they are priced around $700. Another feature I love is the LRF and the ballistic calculator. I zeroed my rifle in three shots and was able to group shots at 50 yards with no problem. It is a game-changer!”
With its integrated laser rangefinder and ballistic calculator, the ZHD520R-V2 ensures precise long-range shooting with remarkable accuracy.
"One-step zeroing is a total game-changer."
Just as Martin Lee Andrada mentioned, the one-shot zeroing feature stands out.
John Ross Rinacke, a previous Arken SH4J user, was looking for a scope that could handle both long-range plinking and nighttime varmint hunting. That's what led him to ZHD520R-V2. He shared, “There's now a freeze-screen function that makes zeroing easier... One-step zeroing is a total game-changer. I zeroed at 50 and 100 yards, then went straight to 300 yards and easily shot a 5-round group on a 4” target.”
William Durnal added, “The freeze frame zeroing function and intuitive controls make this scope all that my *** (a famous brand) should have been.”
This feature is especially useful for hunters who require quick, reliable adjustments in the field, ensuring they are always ready for their next shot.
"More manual and just natural."
After listening to user feedback from the ZULUS HD V1 series, we aimed to provide more intuitive control in the V2. This resulted in noticeable changes in the ZHD520R-V2's design. John Ross Rinacke noted, “The zoom wheel was replaced with a throw lever, which is a nice touch.”
@On the Chase Outdoors also praised the change, saying, “They've changed the zoom feature from a little scroll wheel. They've upgraded to a traditional zoom style with a little knob. It's a lot easier to find at night. It's a lot easier to manipulate and know what you're doing. It feels a little more manual and just natural.”
Additionally, @Top Shot Dustin echoed similar thoughts, saying, “It's genius because it's just like a traditional scope.”
This design makes zoom adjustments much easier, even when wearing gloves or in low-light conditions.
"The interface is much more intuitive."
Beyond its appearance, the ZULUS HD V2 series has also undergone internal upgrades. Taking inspiration from DNT Optics' flagship ThermNight series, the ZULUS HD V2 series now offers a much smoother and more convenient interface, making it easy to master with little instruction.
Jarrod Copeland remarked, "Features are great and navigation is simple."
@On the Chase Outdoors highlighted, "Another thing I really like is they've upgraded the display and the buttons. It's the same as the ThermNight now. The features on the screen are just incredible."
John Ross Rinacke commented, “With the updates in the V2, this optic is a major improvement over what I saw in videos of the V1. The interface is much more intuitive.”
Screenshot from @On the Chase Outdoors' video
Conclusion
To sum up, the ZHD520R-V2 impresses users with its clarity, precision, and enhanced features. In addition to the highlights above, users have praised its "recoil activated recording", "an upgraded 10-hour battery", "IP67 water resistance", and more. Whether for long-range hunting, night tracking, or recreational shooting, this scope delivers a premium experience at a competitive price.
Priced at only $776.99, you can even get 10% off by using code SAVE10.
Feeling tempted? Explore the ZULUS HD series now to find the perfect scope for your next adventure
Learn More >
- Choosing a selection results in a full page refresh.


