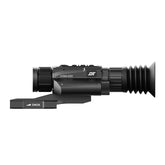
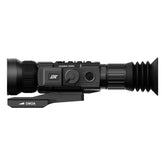
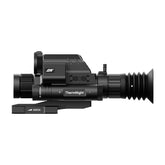
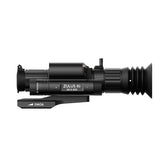
A Triple-headed Marvel
Originally published by Russ Douglas at AIRGUN WORLD, this article examines the DNT Hydra HS335 thermal scope, a super-compact technical marvel that also easily acts as a spotter or front dayscope add-on. We're excited to share his insights.
The name may come from Greek mythology, describing a multi-headed serpent, but DNT’s new Hydra thermal scope “only” has three roles — and, for me, it performed two of them very well indeed. It comes nicely boxed, with everything safely protected inside a partitioned, zippered semi firm case, including a soft wrist lanyard. Inside are the scope, a cardboard box containing a 20 MOA Picatinny mount adapter, four countersunk T25 Torx screws and a Torx wrench. Also included are a pull-on/off corrugated rubber eyecup, sprung objective lens cap, instruction manual, lens cloth and a USB-A to USB-C download cable.

All models take a single 18650 flat-top battery, display on a Micro OLED screen at 1024 × 768px, and record video with sound at 50 FPS onto 32GB internal memory. Base weight is 380g and size is just 202mm × 68mm × 50mm. I tested the HS335, identifiable by its name badge and 35mm objective lens.

In scope configuration this model weighed 573g (1lb 4.2oz) all-in, including the Picatinny adapter, four T25 screws, flat-top 18650 battery, eyecup and sprung lens cap. On the left side is an unobtrusive battery compartment (insert flat-top 18650 +ve end first), with a long, wellgrooved cap — sure signs the DNT design team applied lessons learned when recently designing their ZULUS V2 models. There’s a captive round rubber cap on the right side to protect the USB-C comms port (for downloading recordings, but not for charging the onboard battery), and aft of that a flat synthetic panel covering the Wi-Fi aerial. All in, the device feels slimline, solid and well-engineered.
FUNCTIONALITY
First off, it comes ready to use as a handheld spotter and, being compact, is pretty handy too—only missing (for me) a neck lanyard ring, so I could walk on crutches while keeping it accessible. I was able to direct it and access all the buttons one-handed while leaning on one crutch, only using both hands when required to focus the rear display’s grooved/ridged alloy dioptre collar or the front objective lens’ ridged, rubberised focus collar. The latter is quite stiff, which is one of only two niggles I had when reviewing the unit. If fortunate enough to buy one, I’d add a standard fishing coaster for rifle-mounted use, until things ease off a touch through regular use. The raised power button is at the front, followed by a discreet LED power indicator and three more rubber buttons: zoom, settings and record (Zoom and Record act as up/down menu buttons). The unit takes around 10 seconds to power up (blue LED) and can be quickly put into or taken out of standby with one press — though the amber standby LED is faint.

The uncluttered display includes a discreet DNT logo in the bottom-left; top-right (left to right) are zoom status, audio, battery level (four bars) and time. The zoom control cycles upwards through 3x, 4.5x, 6x, 9x, and 12x, then back to 3x.
Display-wise, the palettes are White-hot, Black-hot, Red-hot and Iron-hot. My functional preference is White-hot, although I usually check whether Black-hot works better in the current weather conditions. Naturally, White-hot mode results in a darker screen and therefore less nighttime “stink eye”, although the display brightness can be adjusted via the menu within the sub-menu “Function Settings”. With Gyroscope enabled, there’s also a cant indicator (centre-left) and an inclination/declination indicator (centre-right), though I prefer to disable these to minimise distractions. The buttons above and below the menu (return) button step through the various menu options; after selecting an item, a longer press on the menu button returns to the previous tier.
Being a triple-role imager, the naturally comprehensive menus offers:
MAIN MENU
-
Recoil Activated Recording (Auto mode, Manual mode, Off)
-
Image Super Resolution (On / Off)
-
Thermal Image Settings
-
Thermal Imaging Mode (Natural / Enhanced or Highlight)
-
NUC, AKA non-uniformity correction (Auto mode or Manual mode)
-
Palettes (White, black, Red or Iron)
-
Image Contrast (1-5) Image Brightness (1-5) Image Sharpness (1-5)
-
Hotspot tracking (on / off)
-
-
Function Settings
-
Defective Pixel Repair (manual functionality)
-
Auto Power Off (Off, 10 minutes, 20 minutes or 30 minutes)
-
Loop Recording (Off, 1min, 3 minutes or 5 minutes)
-
Audio Recoding (On / Off)
-
Gyroscope (On / Off / Calibration)
-
Brightness (levels 1 – 5)
-
-
System Settings
-
Date / Time
-
Language setting
-
Format
-
Restore default settings
-
Available Storage
-
Version
-
-
Clip-On Mode (On / Off) – this adjusts the display to a smaller / central portion of the screen, for rear scope viewing, as the corners of the display will no longer be visible
-
Connections – WiFi (On / Off)
-
Reticle Zeroing
-
26 lettered profiles A–Z
-
Freeze (On / Off)
-
X: (adjust values using up or down buttons)
-
Y: (likewise)
-
Save
-
Exit


-
-
Reticle Settings
-
Reticles
-
1 FFP (MIL)
-
2 FFP (MOA)
-
3 – 8 SFP. My Flickr album includes screenshots of all reticle designs
-
Hide (for spotting)
-
-
Reticle Colours
-
Red
-
Green
-
Yellow
-
Black
-
White
-
-
-
PIP (overlapping squares) Settings
-
Off / Left / Centre / Right
-
PERFORMANCE
I found the image very natural, with good “shades of grey”, and not at all harshly contrasted like some thermal imagers. Naturally, however, due to the limitations of the sensor array size, progressive zooming inherently becomes more pixelated as magnification increases. You can remove the rubber eyecup and rest the eyebell against your eyebrow for spotting or PCP shooting, but thankfully the display wasn’t obscured when using the corrugated eyecup — so for once I left it on to reduce extraneous light.
I first watched a rabbit on our track at around 120 metres, then another in our garden at about 30 metres — the detail was great. I was confident I’d have seen anything visible out to many hundreds of metres, as I could even see insects in the air. I found the two colourful palettes a bit jarring and perhaps slightly pixelated — this is because there are hundreds of shades of grey, but far fewer colour shades within the display.
Activating “Image Super Resolution” via the menu does clean up the image slightly, so it’s worth remembering this. As with all thermal imagers, periodic recalibration is required — where the sensor “clears” or refreshes — often called Flat Field Correction (FFC). With the Hydra, this is “NUC” or “Non-Uniformity Correction”: a split-second pause or freeze in the image when on Auto, so it’s literally “blink and you miss it”, although you’ll hear the faint click. There’s no warning or countdown when this is approaching, though you can select Auto or Manual calibration via the menu.

AIR RIFLE MOUNTING
Like the improved DNT ZULUS V2, the Hydra comes with either a 0 MOA or 20 MOA mount — both are cross-compatible across the DNT range. The Picatinny adapter includes a fixed recoil arrestor bar and connects to the scope underside via four countersunk T25 Torx screws. The mount’s side clamp secures to your rifle’s Picatinny rail using three T25 coach screws, and an L-shaped T25 Torx wrench is supplied.
I mounted the 0 MOA version on my Krait near the rear of the rail. Eye relief was good after I slightly extended the Krait’s rear buttstock — perfect. Being thermal, there’s no active IR illumination required, though as with all thermal imagers, avoid looking at intense heat sources to protect the sensitive onboard sensor.
ZEROING
This proved to be an absolute doddle, and thanks to the Hydra’s sensitivity, I didn’t need any thermal targets. I simply stood a sheet of plywood at 9m (ranged with a prototype DNT Hound thermal spotter with onboard LRF, as the Hydra doesn’t have one), and my first shot was clearly visible and very central. That glowing impact became the aim point for my second shot.
Within the menu, step through options using up/down, select via the Settings button (yellow highlight), adjust values, then deselect to lock it in. Choose your zero name from A to Z. I repeated this process at 21m and again at 31m—zeroing the combo in just a few shots.
As usual with any “one-shot zero” system, it can take a few attempts to freeze the image precisely, but the Hydra’s sensitivity meant the pellet impacts glowed long enough. I then tested it further at 52m on an old shed wall. The impacts didn’t glow as brightly — possibly due to reduced friction — but they were still visible, which was impressive.
My 30m zero values were just X: 21 and Y: 33 — perfectly central — proving the 0 MOA mount was the right choice for my Krait’s 20 MOA rail. Above 3x magnification the reticle auto-centres — an excellent feature to keep the image aligned even if significant X or Y offset is required.

ADD-ON OR NOT?
I’m generally not a fan of add-ons, whether at the front or the rear. But I don’t currently own a rifle with a sufficiently long Picatinny rail to mount both the Hydra and a compact day scope, so I couldn’t test this format. For those who can, mount the Hydra in front of your day scope, set it to “Clip-On” mode, and either disable the digital reticle and use your day scope’s reticle, or enable it and ignore the glassetched reticle. Then adjust the Hydra’s dioptre and your scope’s objective focus until the thermal display is clearly visible. Naturally, due to possible misalignment on reattachment, a zero check is essential before engaging live quarry to ensure humane dispatch.
I’ve been very impressed with how easy it was to mount and zero, and how clearly it displayed thermal signatures downrange, from pellets in a shed to warm patches of grass left by rabbits.

Prices starts from $699.99 (after 10% off with code: SAVE10). For more information on the DNT Hydra, visit here.


